
How to Create, Edit or Delete a Certificate
How to Create, Edit or Delete a Certificate
In this article:
- Overview
- Before you start
- How to create a Certificate
- Attaching the Certificate to a learning
- Personalising the certificate PDF
- Previewing your certificate
- How to edit a Certificate
- How to delete a Certificate
- Things to keep in mind
- FAQs
- Who can do this
Overview
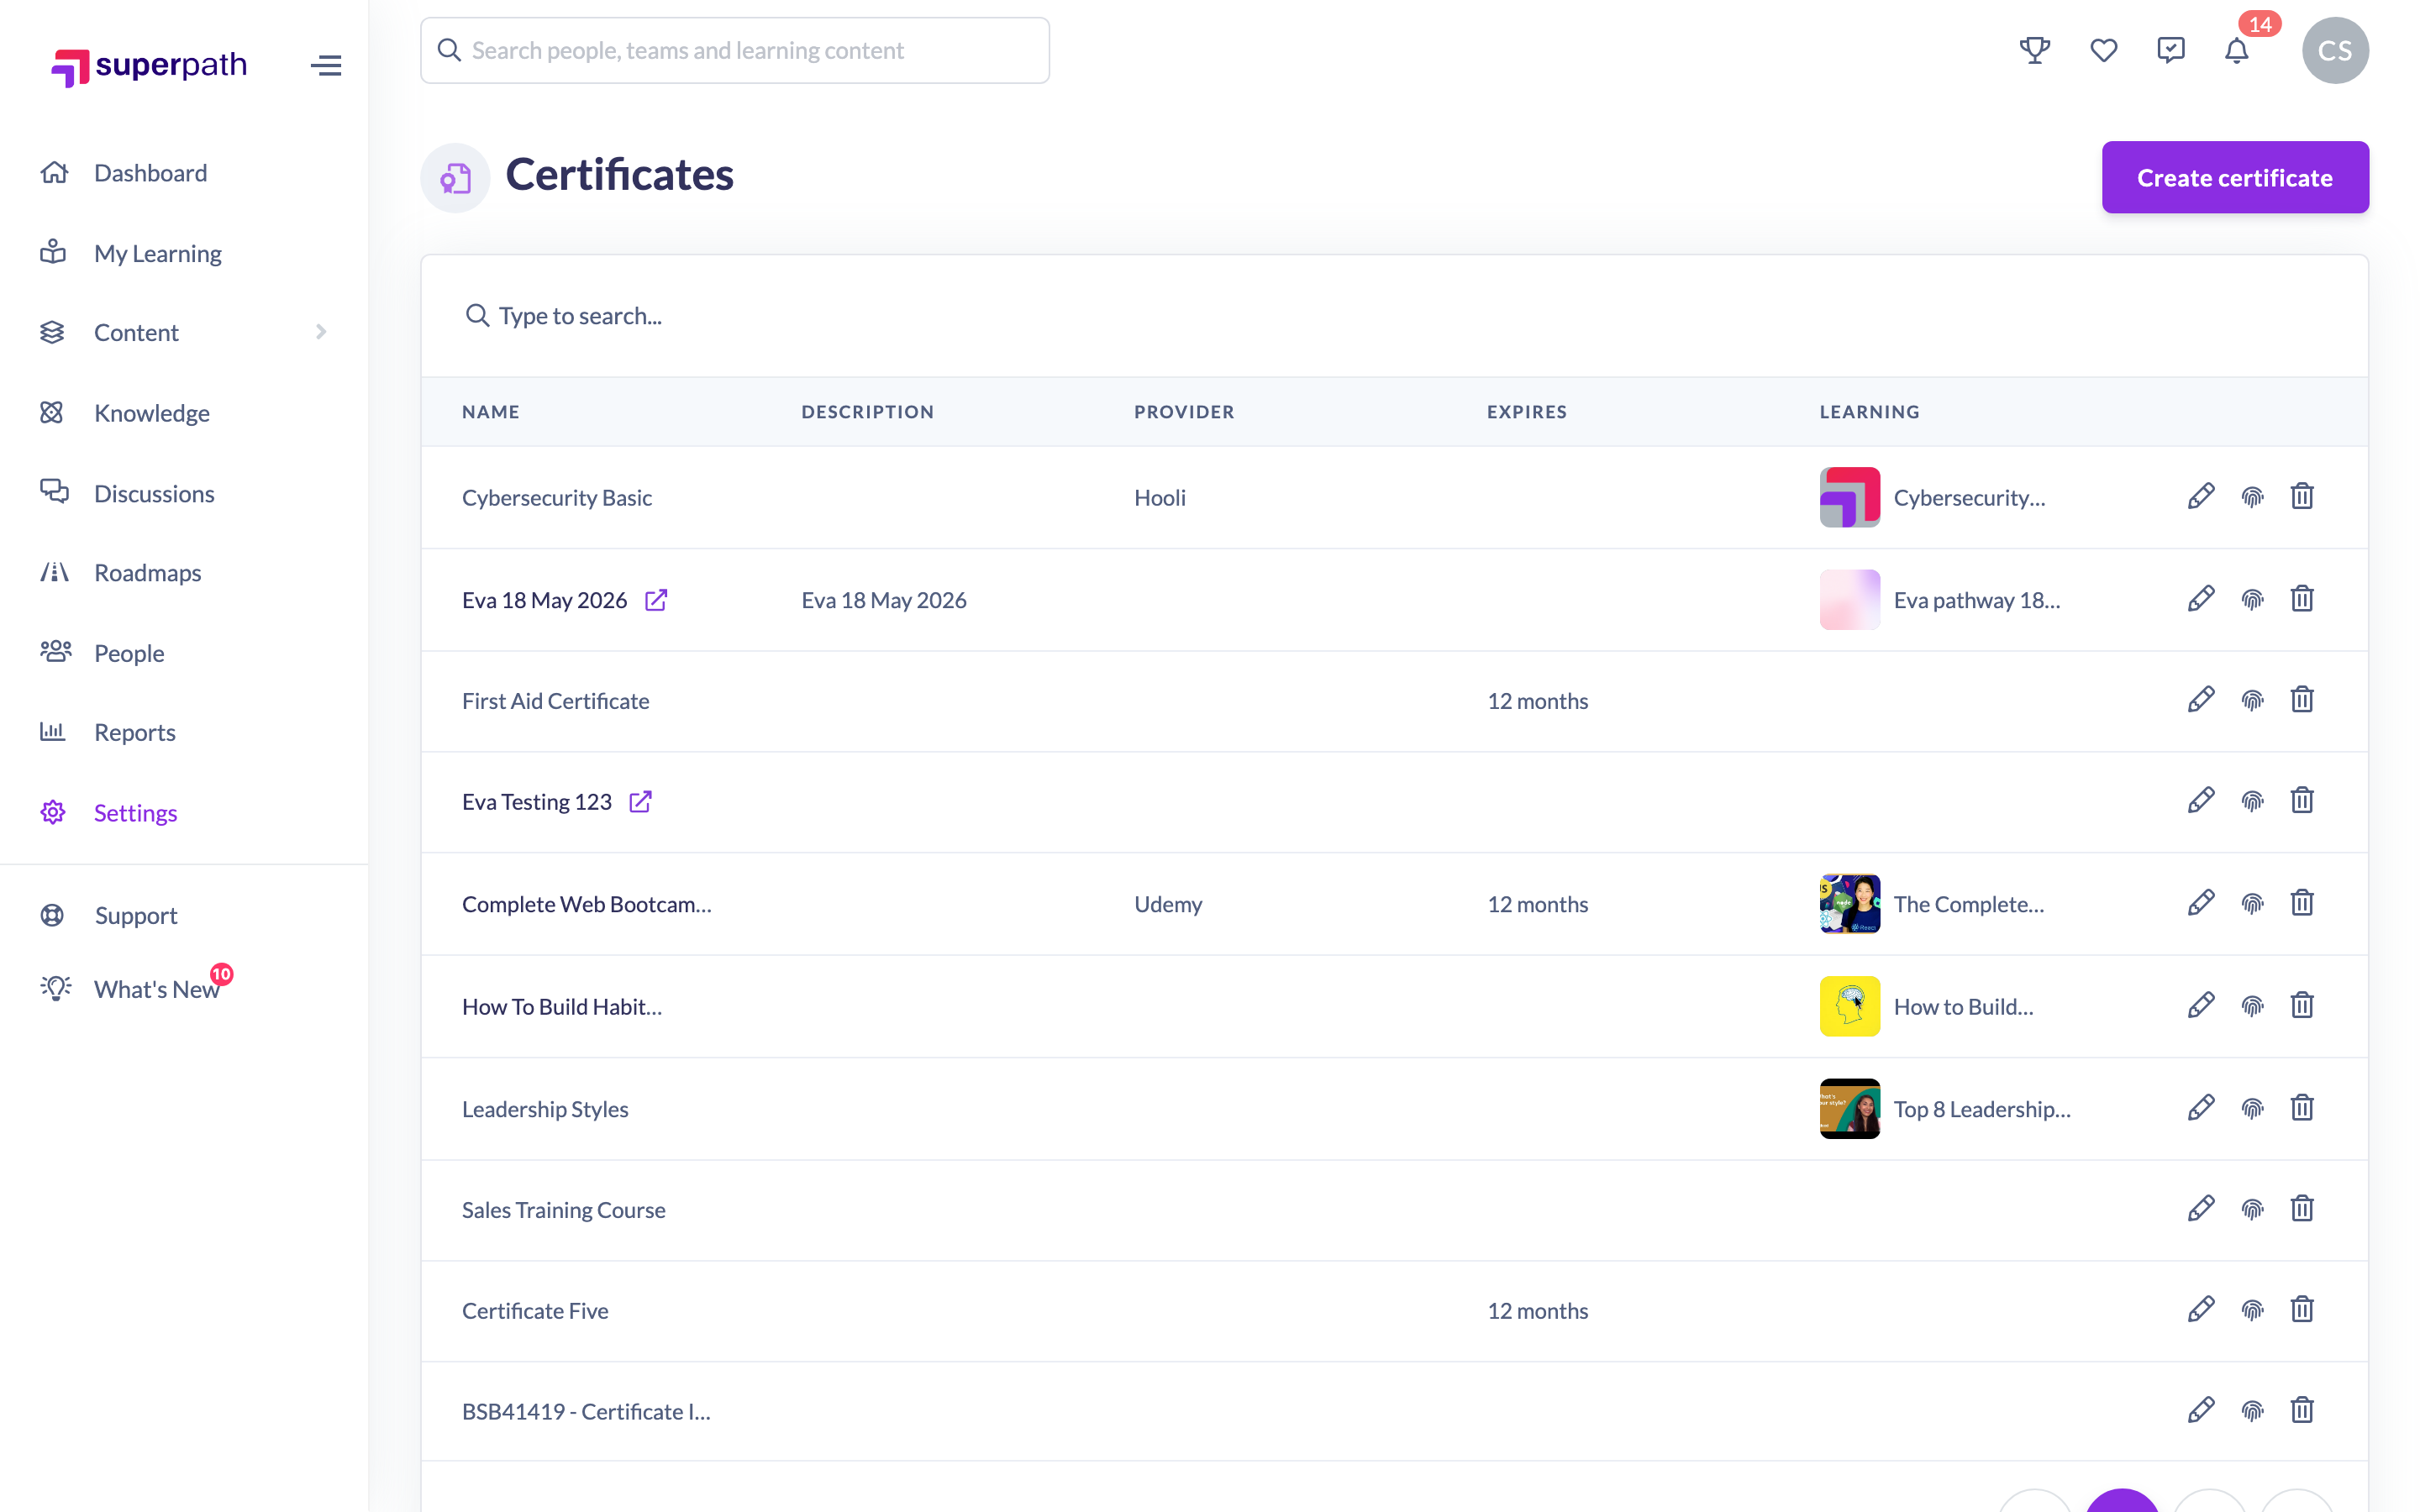
A Certificate is a reusable award you can attach to learning — a Pathway, Course or Event — so your people receive recognition when they complete it. From the Certificates screen you can create the Certificates your organisation offers, edit their details, and delete ones you no longer need. Each Certificate can carry a provider, description, icon, an optional expiry period, and an optional PDF certificate file that is issued when a person earns it.
Before you start
Certificates must be enabled for your account. If you don't see the option, go to Settings → Features, switch on Enable Certificates on your account, and save. Once enabled, a Manage Certificates button appears in the same Features section that takes you to the Certificates screen.
How to create a Certificate
- Go to Settings → Features and click Manage Certificates.
- Click Create certificate in the top right.
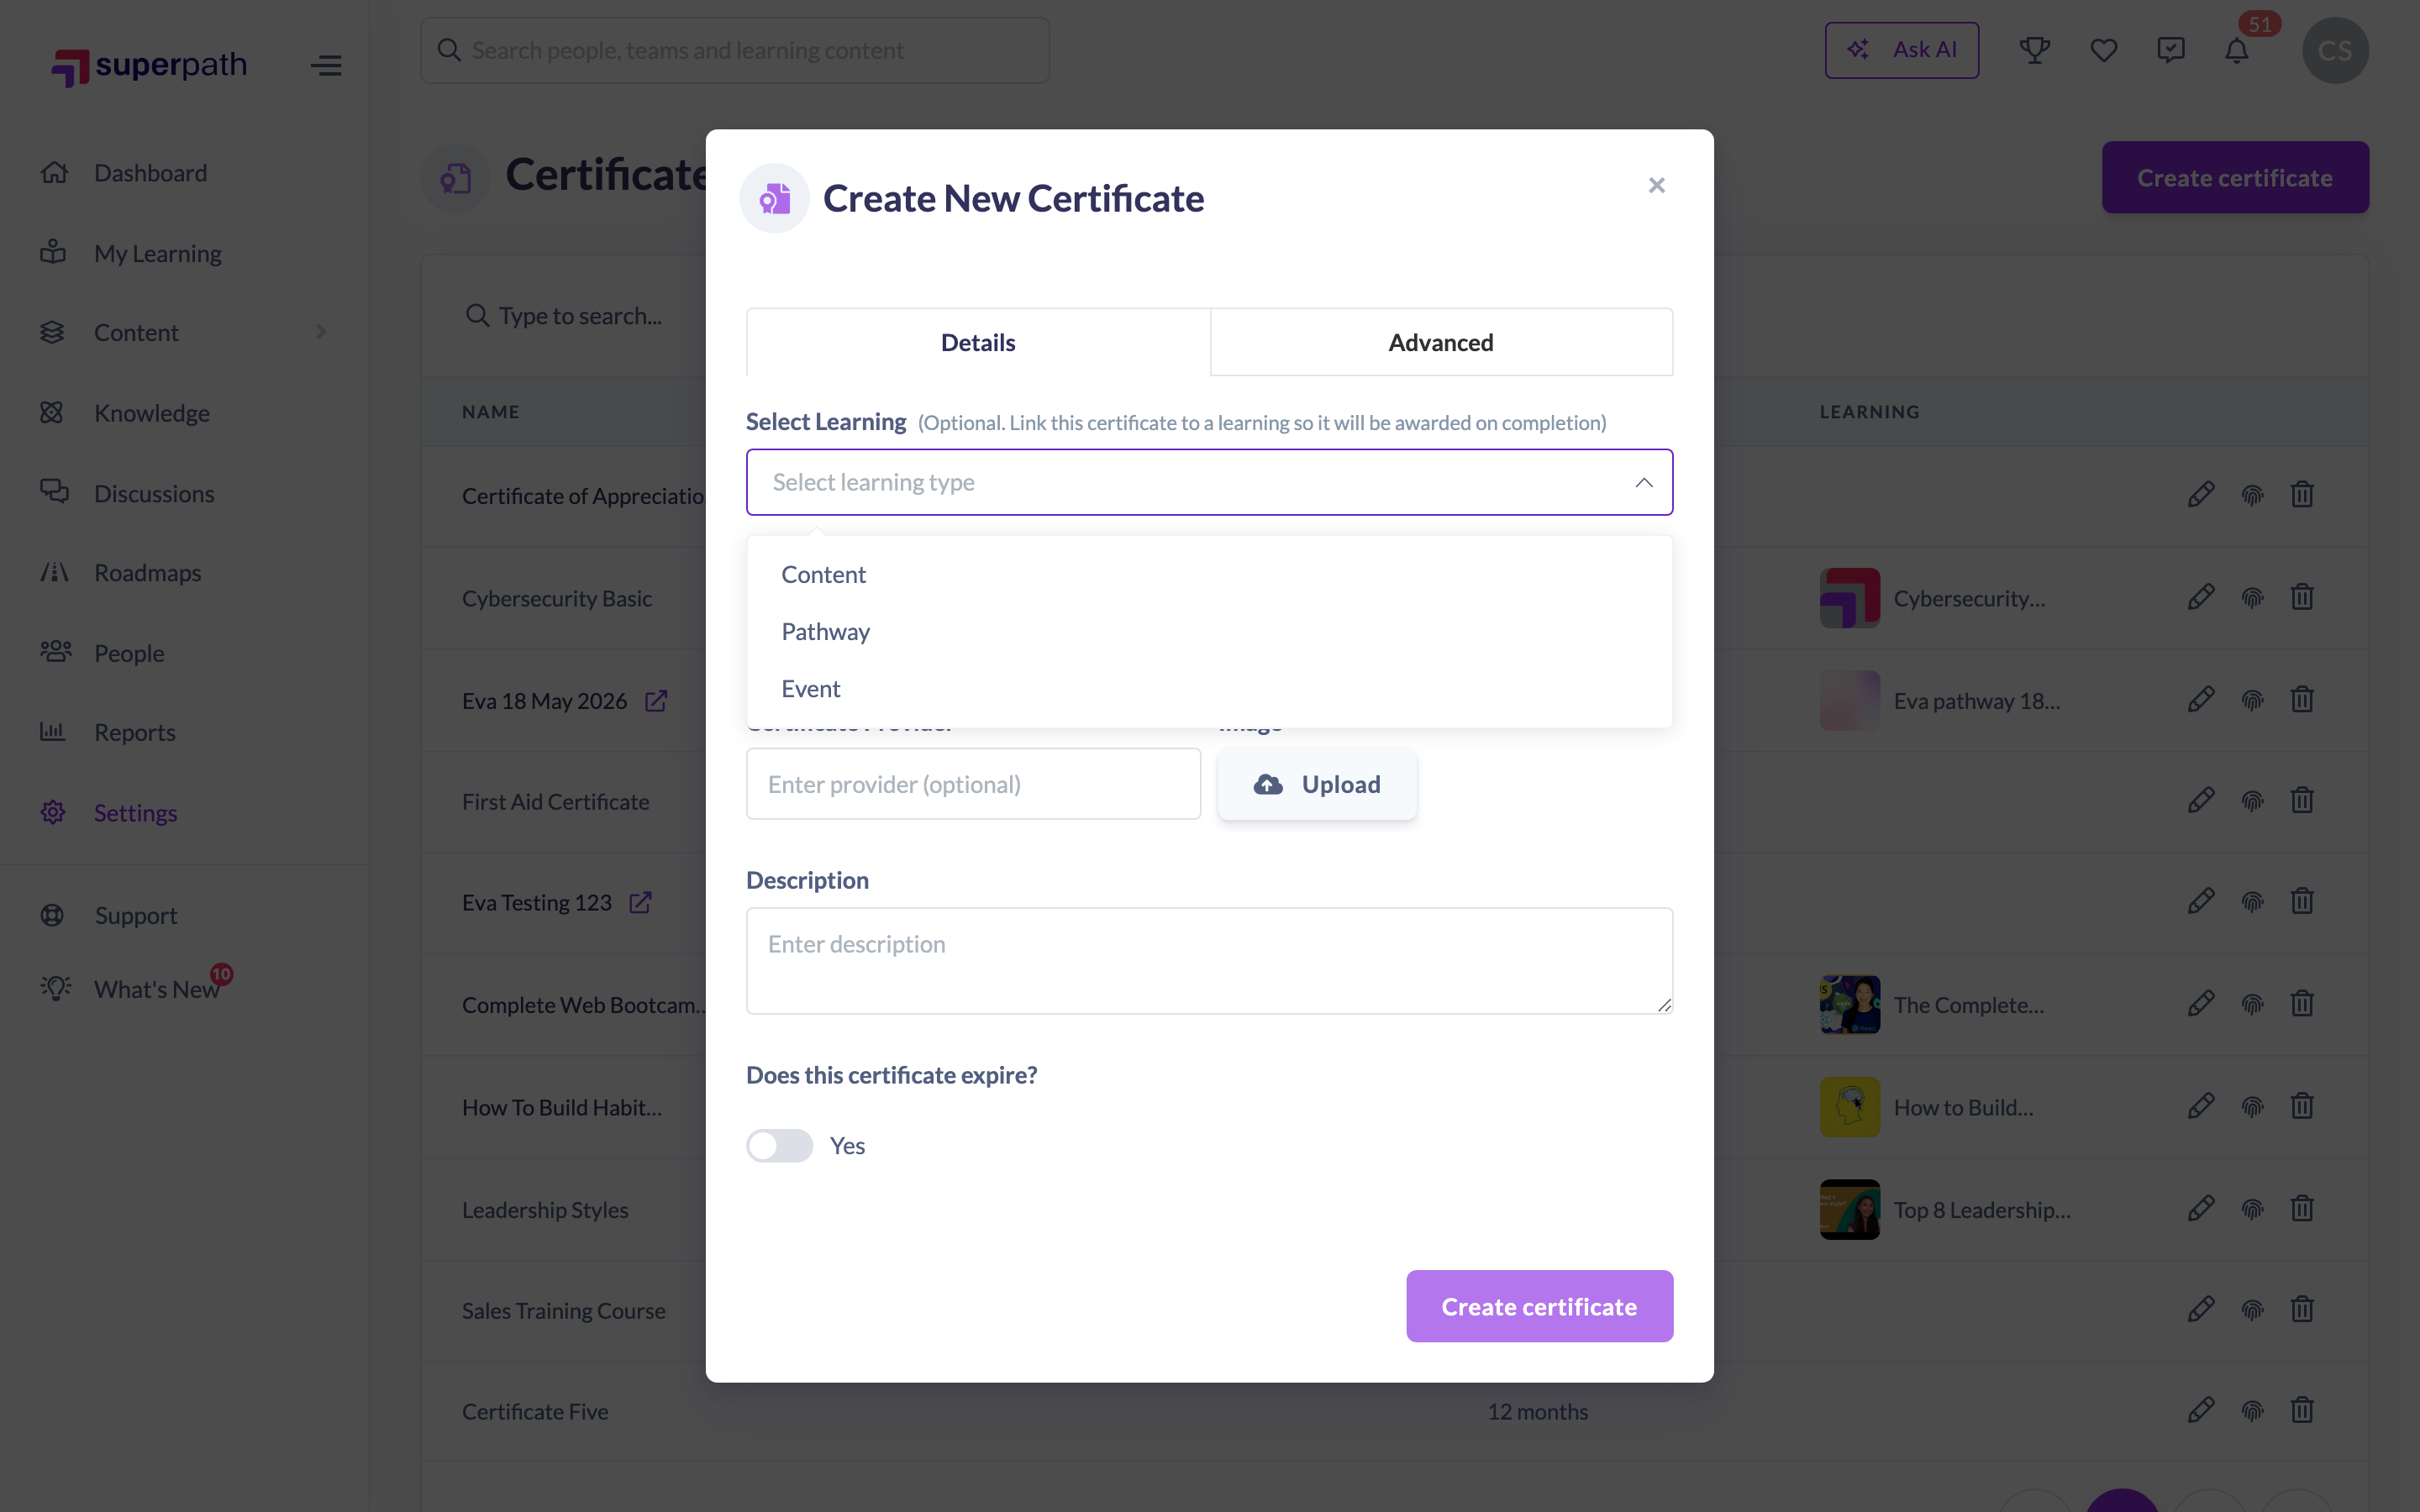
- On the Details tab, optionally pick the learning this Certificate should be awarded for under Select Learning — see the next section.
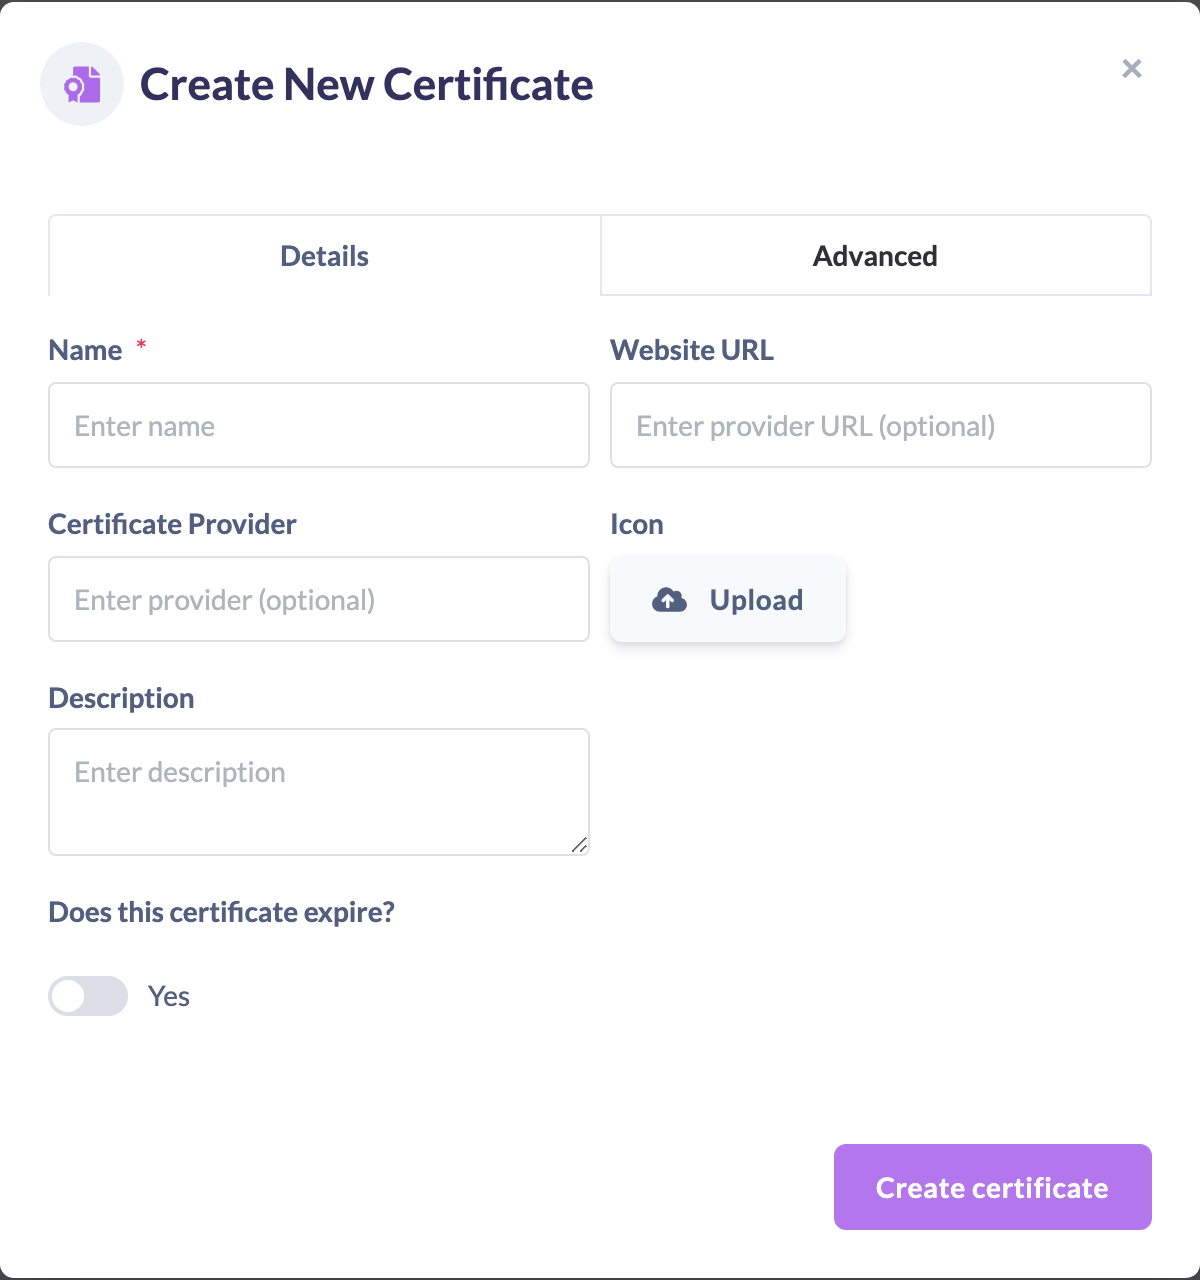
- Enter a Name (required). Optionally add a Certificate Provider, a Description, a provider Website URL, and an Icon image.
- Use Does this certificate expire? to set whether the Certificate lapses. If it does, set the number of months it is valid for.
- If the Certificate expires, you can set up expiry reminders under Notify on Certificate Expiry — switch on Notify Manager and/or Choose specific people to notify to pick individual people or Teams.
- (Optional) On the Advanced tab, upload a Certificate File (PDF) to be attached when someone is awarded the Certificate, and choose what SuperPath prints onto it — see Personalising the certificate PDF.
- Click Create certificate.
Attaching the Certificate to a learning
A Certificate only gets awarded automatically if it's linked to a piece of learning. You can make that link from either direction: from the learning itself (see Adding a Certificate to an Event, Learning or Pathway), or from here using Select Learning at the top of the Details tab.
Select Learning is two controls:
- A learning type — Content, Pathway or Event. It starts empty, and the second control only appears once you've chosen a type.
- The learning itself. For a Pathway or Event you pick from a dropdown. For Content you search your Library, then the result you choose is shown with its image and title, with an ✕ to unlink it.
Leaving Select Learning empty is fine — you'll get a Certificate you can award by hand, or link to a learning later.
Note: If the learning you pick already has a Certificate attached, SuperPath warns you. It won't stop you saving, but a learning with two Certificates attached will award whichever one it finds first — so it's worth clearing the old one.
Personalising the certificate PDF
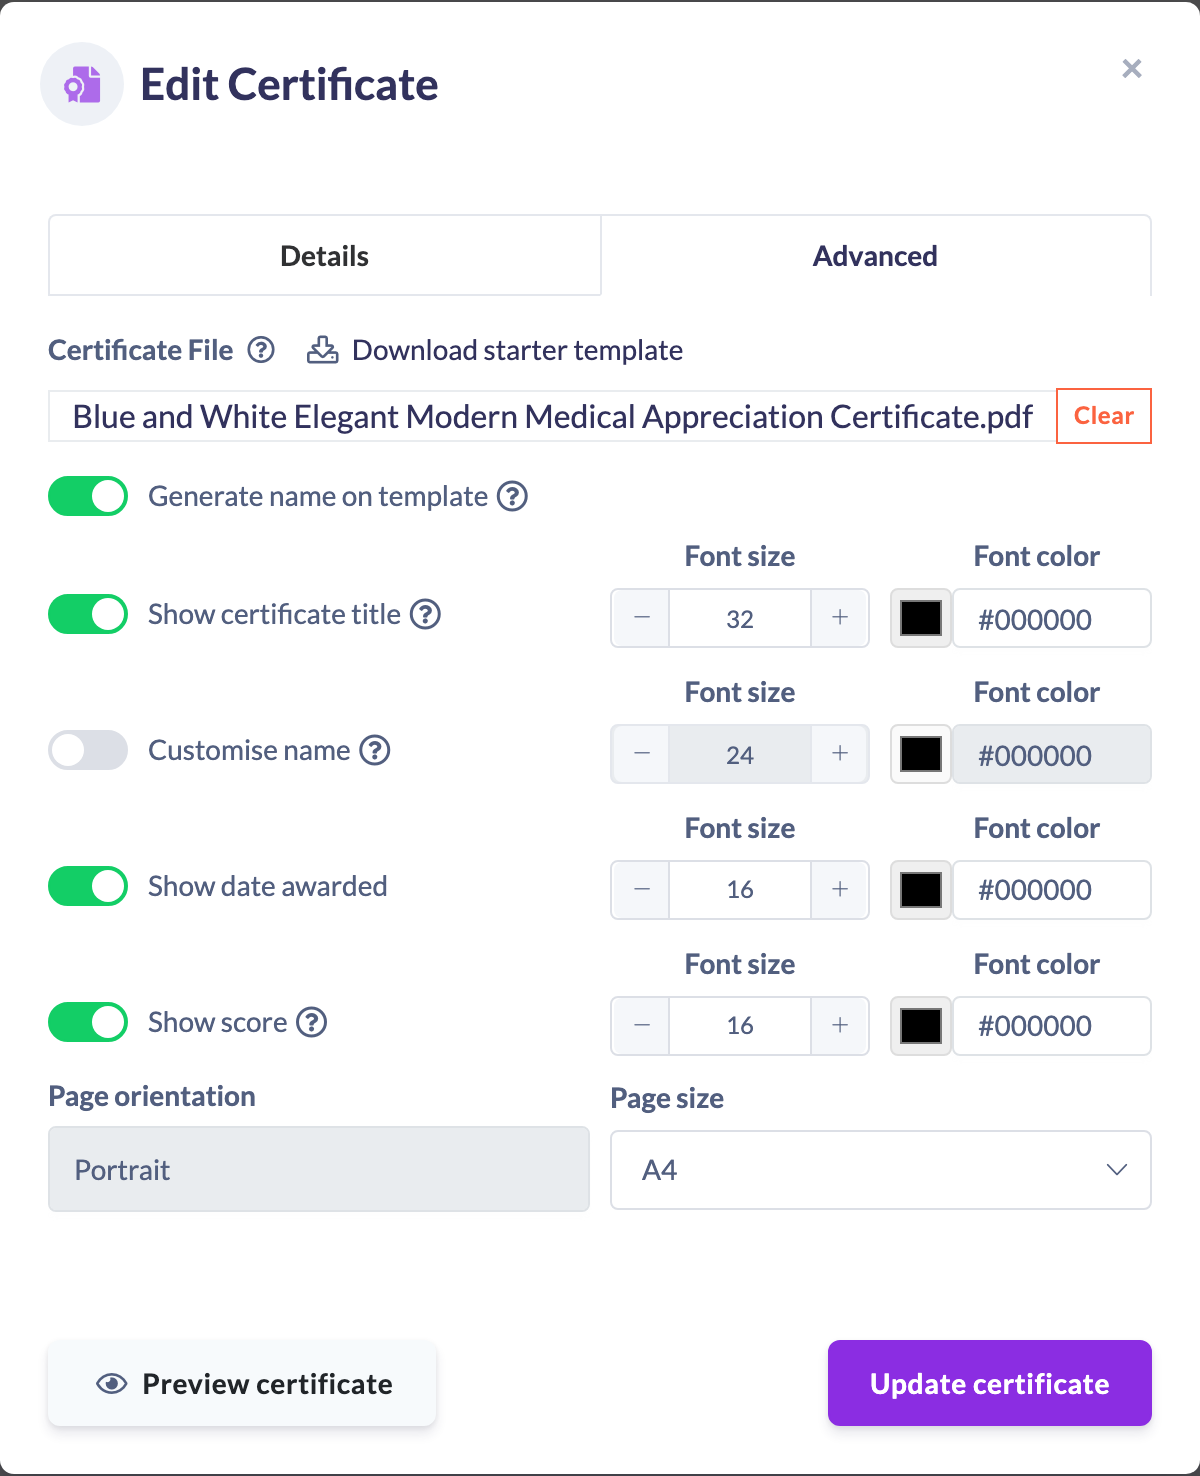
Upload a Certificate File on the Advanced tab and SuperPath can print details onto it as each person earns it, turning one design into a personalised certificate. If you don't have a design to start from, click Download starter template beside the Certificate File heading to get a blank certificate you can upload as-is to try it out, or open in Word and brand as your own.
Switch on Generate name on template, then choose what appears:
- Show certificate title — prints the Certificate's name above the recipient's name, in a larger font. Leave this off if your artwork already has the certificate name on it, or you'll get it twice.
- Customise name — the recipient's name is always printed when Generate name on template is on; this switch just lets you change its font size and colour.
- Show date awarded — prints the date the Certificate was earned.
- Show score — prints the score as a percentage. Only SCORM and Mindsmith courses record a score, so this stays blank for everything else.
Each field has its own Font size and Font colour. The fields are printed as one block down the centre of the page, in the order above.
Below them, Page orientation is detected from the PDF you upload and can't be changed — rotate the artwork itself if it's wrong. Page size is yours to choose between A4 and Letter, and SuperPath scales your design to fit it.
Previewing your certificate
Rather than awarding a real Certificate to find out where the text lands, use the preview.
- On the Advanced tab, upload your Certificate File and switch on Generate name on template.
- Click Preview certificate at the bottom of the modal.
- Fill in the sample details — a name, a date, a score. Only the fields you've switched on appear.
- Generate the preview and open the PDF that downloads.
- Adjust the font sizes and colours, and preview again until it sits correctly on your design.
- Click Back to editing to return, then save the Certificate.
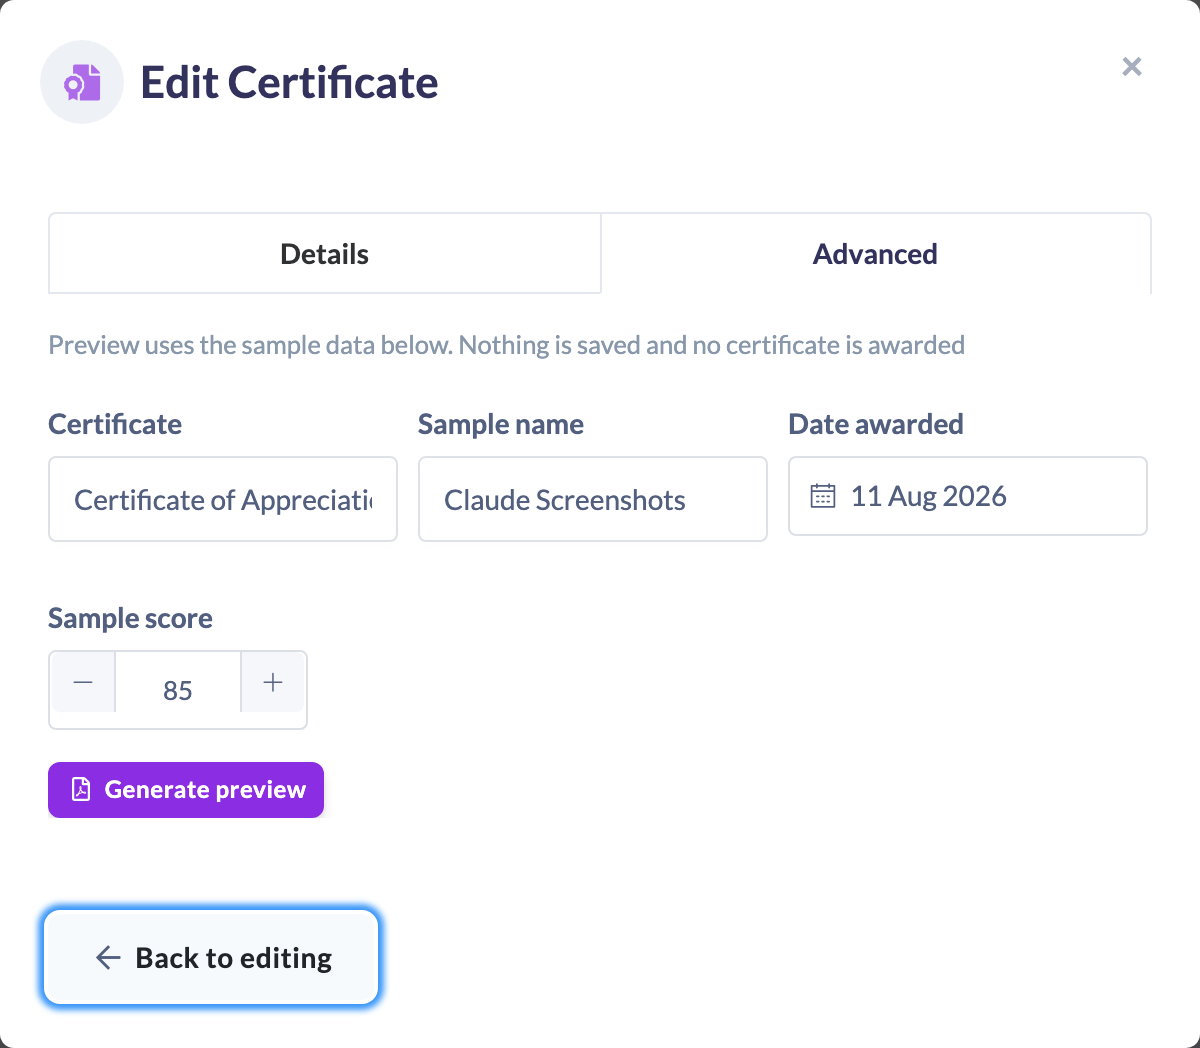
Good to know: The preview saves nothing and awards nothing — it's a throwaway PDF for checking your layout. Try a long name while you're there, since that's what usually overflows a design.
How to edit a Certificate
- Go to Settings → Features and click Manage Certificates.
- Find the Certificate in the list and click the pencil (Edit) icon in its row.
- Change any of its details on the Details or Advanced tab.
- Click Update certificate.

How to delete a Certificate
- Go to Settings → Features and click Manage Certificates.
- Find the Certificate in the list and click the trash (Delete) icon in its row.
- In the Delete certificate confirmation, click Confirm Delete.
Things to keep in mind
- Creating and editing Certificates is only available on a desktop or tablet — on a mobile device the screen shows a message asking you to switch to a larger device.
- Name is the only required field. The learning, provider, description, website URL, icon, expiry and the certificate file are all optional.
- The template options only appear once you upload a PDF certificate file on the Advanced tab, and Generate name on template also needs the Certificate to have a name.
- The recipient's name is always printed when Generate name on template is on. The certificate title, date and score are each opt-in.
- Show score only produces anything for SCORM and Mindsmith courses, which are the only sources that record one. A Certificate awarded for a Pathway never carries a score.
- Page orientation follows the PDF you upload and can't be overridden in SuperPath.
- Changing a template doesn't update Certificates already issued — see How to Regenerate a Certificate.
- Deleting a Certificate cannot be undone — you'll be asked to confirm before it's removed.
FAQs
Do I have to upload a PDF for the Certificate?
No. The certificate file is optional. If you don't upload one, the Certificate still records the award against the learner; the PDF is only attached when you provide a file.
Can I set a Certificate to expire?
Yes. Switch on Does this certificate expire? and set the number of months it stays valid. You can then optionally notify the person's Manager and/or specific people or Teams when it's due to expire.
Where does a Certificate get used?
Certificates are attached to learning — such as a Pathway, Course or Event — so people earn them on completion. You can make that link here under Select Learning, or from the learning itself.
I don't have a certificate design. Where do I start?
Click Download starter template beside the Certificate File heading on the Advanced tab. You'll get a blank certificate you can upload straight away to try the feature, or edit in Word to add your own branding before saving it as a PDF.
Why is my score not printing?
Only SCORM and Mindsmith courses record a score. If the Certificate is awarded for anything else — a Pathway, an Event, a standard course — there's no score to print, and the line is simply left off.
I changed my template. Do existing certificates update?
No. Certificates already awarded keep the PDF they were issued with. To bring one up to date, regenerate it from the person's Certificates tab.
Can I move the name somewhere other than the centre?
Not from the interface. The printed fields are centred as a block; contact the SuperPath team if you need a custom placement.
Who can do this
Certificates are managed from within Settings, which only Owners and Admins can open, so in practice they create, edit and delete Certificates here. The underlying permission to create, edit and delete a Certificate is also held by Managers and Content Managers. People Managers, Instructors, Employees and Restricted users have read-only access and cannot create, edit or delete Certificates. Enabling Certificates for the account (under Settings → Features) is limited to Owners and Admins.
Select Learning is narrower than the rest of the form: only Owners and Admins see it. Other roles who can create a Certificate — Managers and Content Managers — won't see the learning selector and should attach the Certificate from the learning itself instead.
Updated on: 11/08/2026
Thank you!